


How to Install a Patio
Looking to elevate your backyard space and create a cozy outdoor haven? Installing a patio is an excellent way to add functionality and style to your home. While hiring professionals to take on the project has its perks, tackling patio installation as a DIY project is completely achievable with the right tools, preparation, and guidance.
This guide will walk you through the step-by-step process of installing a patio, from planning and preparation to finishing touches. By the end, you’ll be ready to lay down the foundation (quite literally) for an outdoor space you’ll love.
Why Add a Patio to Your Outdoor Space?
Before jumping into the nuts and bolts of patio installation, it’s worth considering why a patio might be the perfect addition to your home. Here are some of the top benefits:
- Boosts Property Value: A well-designed patio is a sought-after feature for potential home buyers and can increase your property’s resale value.
- Creates Versatile Outdoor Space: Patios are perfect for al fresco dining, entertaining guests, or simply relaxing with a good book.
- Enhances Curb Appeal: With many design options, a patio can add charm and a sense of completeness to your yard.
- Cost-Effective Living Space: Compared to full-scale renovations, a patio provides additional living space without breaking the bank.
Now that you understand the impact a patio can have, let’s get started on your DIY installation.
Tools and Materials You’ll Need
Having the right tools and materials on hand is key to a smooth installation process. Here’s what you’ll need:
Tools:
- Rubber mallet
- Tamper or plate compactor
- Trowel
- Broom
Materials:
- Paving slabs, bricks, or stones
- Edging materials (steel or plastic)
- Coarse sand or gravel for the foundation
- Patio base material
- Polymeric sand for filling gaps
- Landscape fabric for weed prevention
With your tools and materials set, it’s time to start transforming your backyard.
Step 1: Plan and Design Your Patio
The first step in patio installation is planning. This is where you determine the size, shape, and material of your patio.
Tips for Planning Your Patio:
- Define Its Purpose: Will your patio be primarily for casual seating, dining, or placing a fire pit? Knowing its main purpose will guide the size and layout.
- Pick the Right Spot: Choose a flat, well-drained area. Consider access to your house and how sunlight hits the spot throughout the day.
- Choose Materials: Options include concrete pavers, natural stone, bricks, or even gravel for a rustic look. Focus on durability as well as aesthetics.
- Sketch the Design: Use stakes and string or a garden hose to map out the desired shape. Visualize how it will look before committing.
Step 2: Prepare the Ground
Ground preparation is crucial for a stable patio that stands the test of time. Follow these steps:
- Clear the Area: Remove grass, rocks, roots, and debris from the defined space.
- Dig the Base: Excavate the area to about 7-9 inches deep. This ensures there’s enough room for your base layers and paver thickness.
- Level the Ground: Use a rake and a level to make sure the ground is even. Slight slopes for drainage (1 inch drop for every 4 feet) will prevent water pooling on the patio.
Step 3: Lay the Foundation
The foundation ensures your patio is durable and resistant to shifting over time.
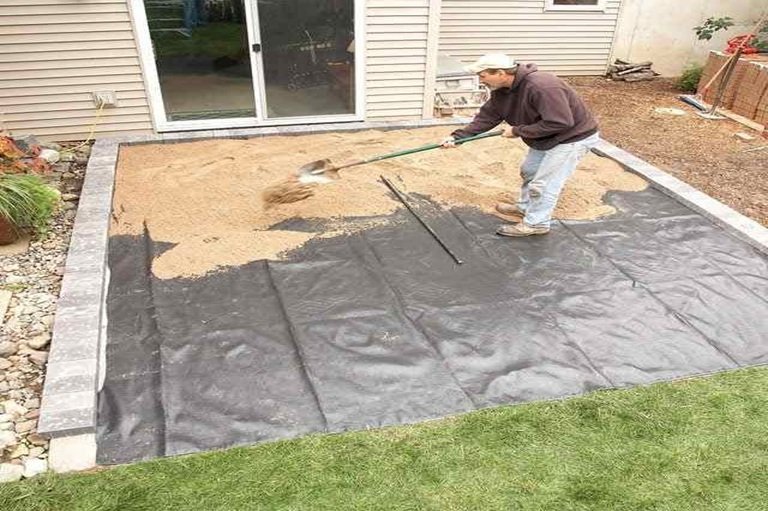
- Add Landscape Fabric: Lay landscape fabric over the excavated surface to prevent weeds from growing through the patio in the future.
- Spread the Base Material: Add a layer of gravel or coarse sand (about 4 inches deep). Compact it well using a tamper or plate compactor.
- Check for Level: Once compressed, ensure the base layer is flat and even, maintaining the slight slope for drainage.
Step 4: Place the Paving Stones
This is where your patio starts taking shape.
- Begin in a Corner: Start laying the pavers or stones at one corner and work your way across, keeping a consistent pattern.
- Ensure Proper Alignment: Use spacers or your eye to maintain uniform spacing between pavers. A rubber mallet can help securely set them into place.
- Level As You Go: Continuously check to ensure the pavers are level. Adjust by adding or removing sand underneath when necessary.
Step 5: Secure the Edges
To ensure your patio stays intact, edge restraint is a must.
- Install Edging Materials: Place steel or plastic edging around the perimeter of the patio to prevent pavers from shifting over time.
- Secure the Edging: Use stakes or spikes to firmly fix the edging in place.
Step 6: Fill the Gaps and Finish
To complete your patio installation, fill the gaps between the pavers and give it that polished look.
- Apply Polymeric Sand: Sweep polymeric sand across the patio, ensuring the gaps between pavers are filled completely.
- Mist with Water: Lightly mist the patio to activate the polymeric sand and lock the pavers into place.
- Clean the Surface: Sweep away any excess sand or debris from the surface of the patio.
Step 7: Add the Final Touches
Now that your patio is installed, it’s time to enhance the space. Consider placing outdoor furniture, potted plants, string lights, or an outdoor rug to highlight your new patio.
Maintenance Tips for a Long-Lasting Patio
Taking care of your patio will ensure it remains stunning for years:
- Sweep Regularly: Remove leaves, dirt, and debris to prevent staining.
- Reapply Polymeric Sand Annually: Fill in gaps as needed to prevent shifting.
- Clean Pavers Twice a Year: Use mild soap and water to keep them looking fresh.
- Seal the Surface (Optional): Sealing pavers can help protect against stains and enhance their color.
Your Backyard Oasis Awaits!


Installing a patio may seem like a daunting task, but with thoughtful planning and a step-by-step approach, your DIY project can turn out just as good as a professional job. Not only will you save money, but you’ll also gain the satisfaction of creating a space that suits your style and needs perfectly.